canvas动画基础
0 条评论0. 引言
- 本次分享主要涉及的是canvas相关的动画相关的思想,主要参考的书籍是《TypeScript图形学渲染实战 2D架构设计与实战》
- 由于本人对于动画只是初入门,有些地方的理解可能比较偏颇的地方,欢迎指正
- canvas在平时写业务的时候可能触及到的不是特别多,可能很多同学对于基础的API了解都不是特别多;用canvas写动画的经历可能就更少了。本次分享不会涉及到过于细节的canvas绘制的API,主要还是聊聊canvas里面动画涉及的一些思想
1. requestAnimationFrame
https://hentaicracker.github.io/2020/rAF.html
定时器是javascript动画的核心技术。一般情况下,javascript动画一般都是通过在定时器中不断改变元素的状态(位置,颜色等属性)来实现。
浏览器中比较常用的定时器技术包括:setTimeout/setInterval/requestAnimationFrame
为什么要使用requestAnimationFrame
setInterval/setTimeout动画存在的问题:
首先使用setTimeout和setInterval存在计时不准确的问题。callback只是在指定时间后,被加入到任务队列中等待被调度,因此,回调执行的时间可能会大于设定的时间。这块有疑问的话,可以参考事件循环机制
setInterval指定的循环周期与页面的刷新频率不同步问题。假设我们暂时不考路setInterval定时器本身的误差,此时我们需要完成一个动画,使得小球以10px/10ms的速度运动
1
2
3
4
5
6
7
let ele = {};
setInterval(() => {
// 更新元素的坐标
ele.x += 10;
// 绘制元素
render(ele);
}, 10);目前大多数电脑的屏幕刷新频率为60Hz,也就是我们理解的1秒中内绘制60帧,任意两帧之间的间隔为16.7ms
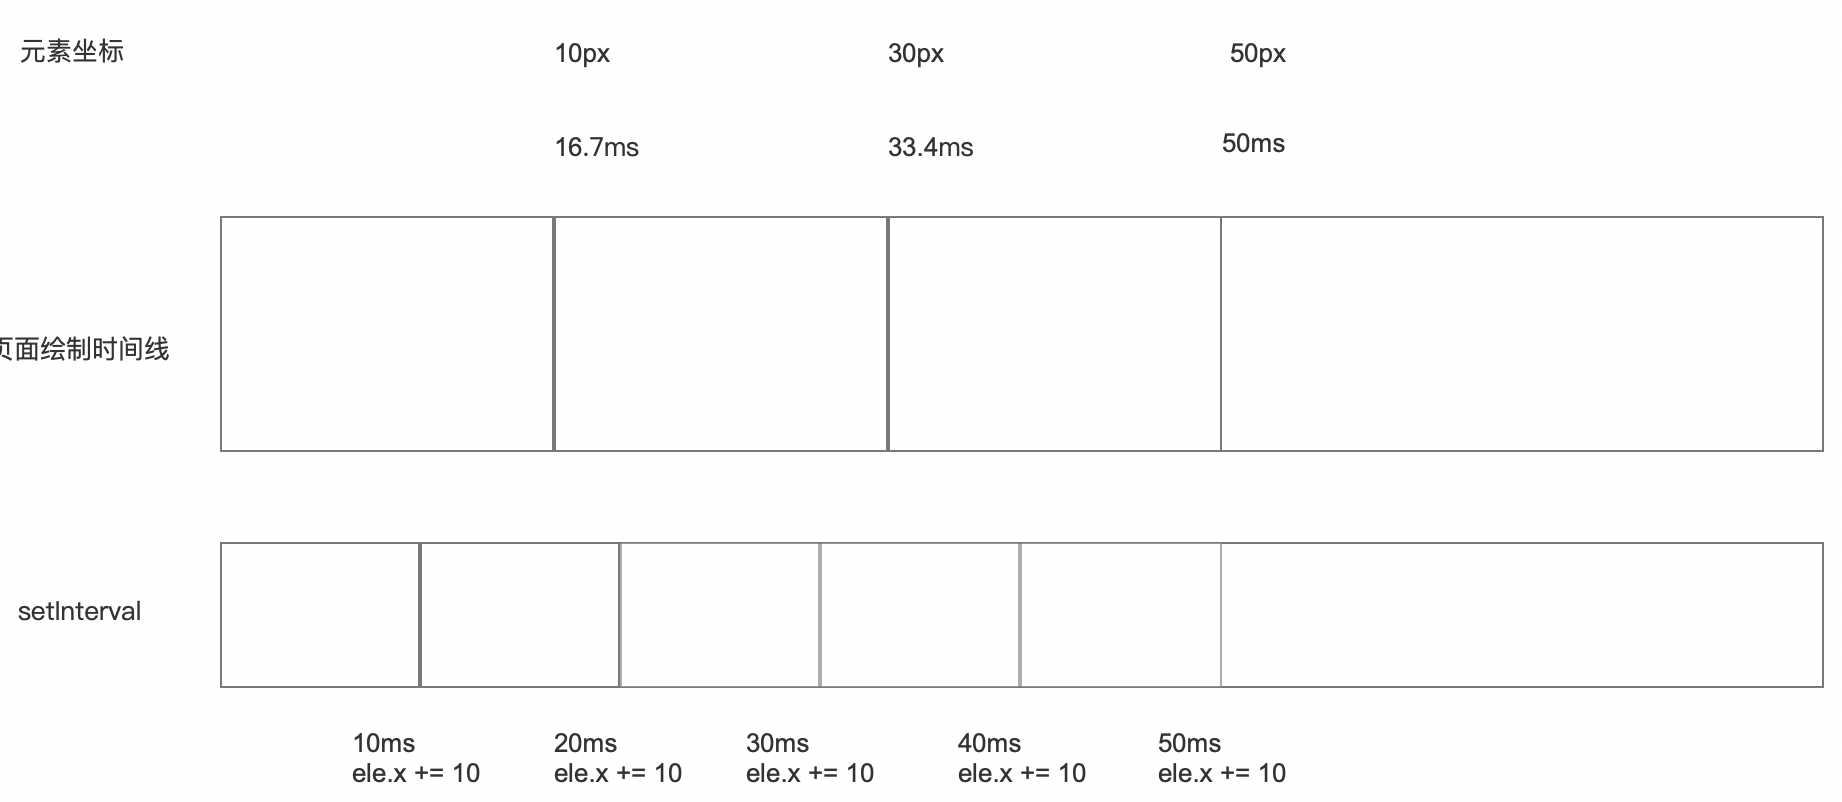
从上面的渲染时间线中我们可以看到,在第一帧的时候,元素向右移动了10px,而第二帧移动了20px,第三帧移动了20px,后面会产生一个循环。
在渲染第二帧时,setInterval执行了两次,但只绘制了一帧,因而导致了其中的一个状态帧丢失了,因此可能会产生卡顿或者跳帧。但在实际中肉眼可能意识不到丢帧了,但总体动画的流畅度上还是会有一些影响的。
requestAnimationFrame如何解决上述问题
window.requestAnimationFrame()告诉浏览器——你希望执行一个动画,并且要求浏览器在下次重绘之前调用指定的回调函数更新动画。该方法需要传入一个回调函数作为参数,该回调函数会在浏览器下一次重绘之前执行https://developer.mozilla.org/zh-CN/docs/Web/API/Window/requestAnimationFrame
- 根据MDN上的文档可以知道,requestAnimationFrame执行的时机是在每一次页面重绘之前;也就是在每一帧重绘之前调用,也就是基本可以稳定和页面的刷新频率保持一致。每隔16.7ms会执行回调函数
- requestAnimaitionFrame执行的频率与屏幕刷新频率是保持一致的。虽然无法灵活控制执行时间间隔,但是可以通过两帧之间的时间间隔去计算每一帧的偏移或者动画移动速度;同时也可以避免出现跳帧的状况,动画整体上看起来会更加流畅一些。
requestAnimationFrame用法
函数签名:
window.requestAnimationFrame: (callback) => number;
callback:
下一次重绘之前更新动画帧所调用的函数(即上面所说的回调函数)。该回调函数会被传入
DOMHighResTimeStamp参数,该参数与performance.now()的返回值相同,它表示requestAnimationFrame()开始去执行回调函数的时刻。返回值:
一个
long整数,请求 ID ,是回调列表中唯一的标识。是个非零值,没别的意义。你可以传这个值给window.cancelAnimationFrame()以取消回调函数。CASE One:
callback不需要传参
1
2
3
4
5
6
const callback = () => {
// do something...
requestAnimationFrame(callback);
}
requestAnimationFrame(callback);CASE Two:
callback需要传参,匿名函数包裹
1
2
3
4
5
6
7
8
const step = (elapsedMsec, diffMsec) => {
// do something...
requestAnimationFrame(() => {
step(elapsedMsec, diffMsec);
})
}
step(0, 0);- calcelAnimationFrame
1
2
3
4
5
6
7
8
9
10
11
12
13
14
15
16
17
18
19
20
21
22
23
/**
* 启动动画循环的基本结构,通过requestAnimationFrame重复调用step函数
**/
let requestAnimationFrameID;
const step = (elapsedMsec, diffMsec) => {
// do something...
requestAnimationFrameID = requestAnimationFrame(() => {
step(elapsedMsec, diffMsec);
})
}
const startAnim = () => {
requestAnimationFrameID = requestAnimationFrame(
step(0, 0);
)
}
const stopAnim = () => {
cancelAnimationFrame(requestAnimationFrameID);
}
2. canvas中的save和restore
绘图状态
所谓绘图状态,其实主要指的是canvas绘制的属性,即Canvas如何进行下一步的绘制(例如用什么颜色,线条粗细,坐标系等等)
绘图状态主要包含:矩阵变换状态、剪切区域、CanvasContext绘制相关的属性
属性 默认值 描述 strokeStyle #000000指定线段颜色 fillStyle #000000填充路径的当前的颜色、模式或渐变 globalCompositeOperation source-over指定颜色如何与画布上已有颜色组合(合成) lineCap butt指定线段端点的绘制方式 lineJoin miter指定线段端点的绘制方式 lineWidth 1 绘制线段的宽度 miterLimit 10 当 lineJoin为miter时,这个属性指定斜连接长度和二分之一线宽的最大比率shadowColor rgba(0, 0, 0, 0) 指定阴影颜色 shadowBlur 0 指定阴影模糊度 shadowOffsetX 0 指定阴影水平偏移值 shadowOffsetY 0 指定阴影垂直偏移值 绘图状态栈(save和restore的工作机制)
canvas中的绘图状态栈可使用以下代码进行模拟,其用法与CanvasContext的API基本保持一致
1
2
3
4
5
6
7
8
9
10
11
12
13
14
15
16
17
18
19
20
21
22
23
24
25
26
27
28
29
30
31
32
33
34
35
36
37
38
39
40
41
42
43
44
45
46
47
48
49
50
51
52
53
54
55
56
57
class RenderState {
public strokeStyle: string;
public fillStyle: string;
public lineWidth: number;
// ....other props
constructor() {
this.strokeStyle = '#000000';
this.fillStyle = '#000000';
this.lineWidth = 1;
// ... default props
}
clone(): RenderState {
const rs = new RenderState();
rs.strokeStyle = this.strokeStyle;
rs.fillStyle = this.fillStyle;
rs.lineWidth = this.lineWidth;
// ... other props
return rs;
}
}
class RenderStateStack {
private _stack: RenderState[] = [
new RenderState()
];
public get current(): RenderState {
return this._stack[this._stack.length - 1];
}
public save() {
this._stack.push(
this._stack[this._stack.length - 1].clone()
);
}
public restore() {
this._stack.pop();
}
// getters and setters...
get strokeStyle() {
return this.current.strokeStyle;
}
set strokeStyle(strokeStyle: string) {
this.current.strokeStyle = strokeStyle;
}
get fillStyle() {
return this.current.fillStyle;
}
set fillStyle(fillStyle: string) {
this.current.fillStyle = fillStyle;
}
get lineWidth() {
return this.current.lineWidth;
}
set lineWidth(strokeStyle: number) {
this.current.lineWidth = strokeStyle;
}
// ....
}通过一个例子来理解下:
1
2
3
4
5
6
7
8
9
10
11
12
13
14
15
16
17
18
19
20
const renderStateStack = new RenderStateStack();
console.log(renderStateStack.current); // #000000,#000000,1
renderStateStack.strokeStyle = 'orange';
renderStateStack.lineWidth = 5;
console.log(renderStateStack.current); // orange, #000000, 5
renderStateStack.save();
renderStateStack.fillStyle = 'purple';
console.log(renderStateStack.current); // orange, purple, 5
renderStateStack.save();
renderStateStack.fillStyle = 'blue';
renderStateStack.strokeStyle = 'green';
renderStateStack.lineWidth = 4;
console.log(renderStateStack.current); // green, blue, 4
renderStateStack.restore();
renderStateStack.restore();
console.log(renderStateStack.current); // orange, #000000, 5
3. 动画控制器Application类
Application类功能
- 启动动画循环和停止动画循环,start函数和stop函数
- 计算动画持续时间elapsedMsec和两次绘制间隔diffMsec(step函数)
- 基于elapsedMsec和diffMsec进行动画更新(update函数)和绘制(render函数)
Application类基础功能实现代码如下:
1 | class Application { |
1 | class TestApplication extends Application { |
- 第一层动画,两个矩形作为一个整体向右做translate
- 第二层动画,橙色矩形顺时针旋转
- 第三层动画,红色矩形逆时针旋转
从线条动画聊聊动画的绘制思想
线条动画的逻辑比较简单,可以拿画线条的逻辑,去延伸下动画绘制的思想
思想一:
动画中每一帧渲染之前,将前一帧的内容全部清空,然后根据状态绘制当前帧的内容
1
2
3
4
5
6
7
8
9
10
11
12
13
14
15
16
17
18
19
20class TestApplication extends Application {
// ...
begin = {
x: 10,
y: 10,
}
end = {
x: 10,
y: 10,
}
update(elapsedMsec: number, diffMsec: number) {
if (this.end.x > 400) return;
this.end.x += 5;
this.end.y += 5;
}
render() {
ctx.clearRect(0, 0, this._canvas.width, this._canvas.height);
// 绘制当前帧的内容
}
}
思想二:
不清空前一帧内容
1
2
3
4
5
6
7
8
9
10
11
12
13
14
15
16
17
18
19
20
21
22
23class TestApplication extends Application {
// ...
begin = {
x: 10,
y: 10,
}
end = {
x: 10,
y: 10,
}
update(elapsedMsec: number, diffMsec: number) {
// method 2
if (this.end.x > 400) return;
// 记忆前一帧的结束点
this.begin.x = this.end.x;
this.begin.y = this.end.y;
this.end.x += 5;
this.end.y += 5;
}
render() {
// 绘制
}
}可以考虑下这两种方式哪一种更好一些?
4. canvas事件模拟
addEventListener
1
2
3target.addEventListener(type, listener, options);
target.addEventListener(type, listener, useCapture);
target.addEventListener(type, listener, useCapture, wantsUntrusted ); // Gecko/Mozilla only针对上述api,主要想来聊聊第二个参数,listener
第一种用法就是我们平时比较常用的listener以回调函数的方式传入。
这种调用方式是我们平时用的比较多的,在EventTarget对象上触发事件时,会调用回调函数
1
2
3window.addEventListener('click', (event) => {
// ...do something
});第二种用法是传入一个Object类型的listener,要求listener必须实现handleEvent函数
- js写法,只要对象中包含handleEvent函数即可
1
2
3
4
5
6
7const elo = {
handleEvent(evt) {
console.log('event trigger', evt);
}
}
window.addEventListener('click', elo);- ts写法,可以与js相同,但一般会考虑用类的方式创建EventListener对象
1
2
3
4
5
6
7
8
9
10
11
12// EventListenerObject是typescript自带的类型,在lib.dom.d.ts中声明
// interface EventListenerObject {
// handleEvent(object: Event): void;
// }
class CanvasEventListener implements EventListenerObject {
handleEvent(evt: Event) {
console.log('event trigger', evt);
}
}
const elo = new CanvasEventListener();
window.addEventListener('click', elo);
CanvasEventListener
1
2
3
4
5
6
7
8
9
10
11
12
13
14
15
16
17
18
19
20
21
22
23
24
25
26
27
28
29
30
31
32
33
34
35
36
37
38
39
40
41
42
43
44
45
46
47
48
49
50
51
52
53
54
55
56
57
58
59
60
61
62
63
64
65
66
67
68
69
70
71
72
73
74
75
76
77
78
79
80
81
82
83
84
85class CanvasEventListener implements EventListenerObject {
_canvas: HTMLCanvasElement;
constructor(canvas: HTMLCanvasElement) {
this._canvas = canvas;
}
public handleEvent(evt: Event): void {
switch(evt.type) {
case 'mousedown':
this.dispatchMouseDown(
this._event2CanvasMouseEvent(evt)
);
break;
case 'mouseup':
this.dispatchMouseUp(
this._event2CanvasMouseEvent(evt)
);
break;
case 'mousemove':
this.dispatchMouseUp(
this._event2CanvasMouseEvent(evt)
);
break;
// case 'mousesdrag'
case 'keydown':
this.dispatchKeyDown(
this._event2CanvasKeyBoardEvent(evt)
);
break;
case 'keyup':
this.dispatchKeyUp(
this._event2CanvasKeyBoardEvent(evt)
);
break;
case 'keypress':
this.dispatchKeyPress(
this._event2CanvasKeyBoardEvent(evt)
);
break;
}
}
protected dispatchMouseDown(evt: CanvasMouseEvent): void {};
protected dispatchMouseUp(evt:CanvasMouseEvent): void {};
protected dispatchMouseMove(evt: CanvasMouseEvent): void {};
protected dispatchMouseDrag(evt: CanvasMouseEvent): void {};
protected dispatchKeyDown(evt: CanvasKeyBoardEvent): void {};
protected dispatchKeyUp(evt: CanvasKeyBoardEvent): void {};
protected dispatchKeyPress(evt: CanvasKeyBoardEvent): void {};
private _viewportPos2CanvasPos(evt: MouseEvent) {
if (!this._canvas) throw new Error('canvas is not an element');
const bounds: ClientRect = this._canvas.getBoundingClientRect();
const x = evt.clientX - bounds.left;
const y = evt.clientY - bounds.top;
return Vec2.create(x, y);
}
private _event2CanvasMouseEvent(evt: Event): CanvasMouseEvent {
const event = evt as MouseEvent;
const bounds = this._viewportPos2CanvasPos(event);
const canvasEvt = new CanvasMouseEvent(
bounds,
event.button,
event.altKey,
event.shiftKey,
event.ctrlKey
);
return canvasEvt;
}
private _event2CanvasKeyBoardEvent(evt: Event): CanvasKeyBoardEvent {
let event = evt as KeyboardEvent;
const canvasEvt = new CanvasKeyBoardEvent(
event.key,
event.code,
event.altKey,
event.shiftKey,
event.ctrlKey
);
return canvasEvt;
}
}
const listener = new CanvasEventListener();